

Rough heels lead many people to search for how to use callus remover devices. The next worry is filing too deep, nicking the skin or ending up with sore feet. Those problems often come from too much pressure, too much time on one spot, or not knowing when to stop. This guide covers rechargeable electric foot files with rollers or discs, not callus gels or pads.
How to use a callus remover step by step
Check your manual and work on clean, dry feet. Glide the roller lightly over hard skin for 2–3 seconds per spot and keep it moving.
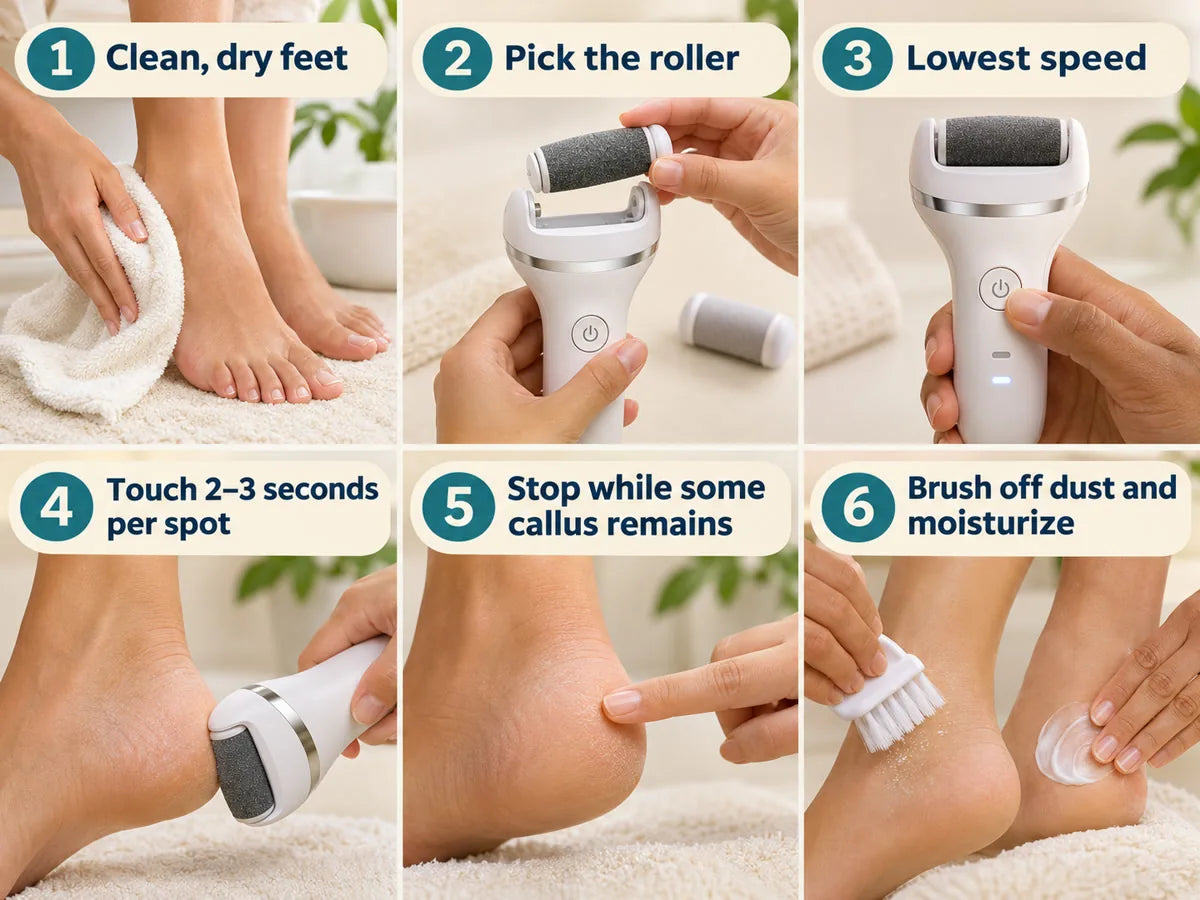
Stop while a thin layer of callus remains, then brush off the skin dust and moisturize. If you have diabetes, poor circulation or reduced feeling in your feet, ask your doctor before you start.
Follow this order from setup to aftercare so you stay in control of pressure and time. The six steps to use a callus remover are:
Step 1: Check your manual and start with clean, dry feet
Read your manual first, because wet or dry use and the time per spot vary by model. Wash your feet and dry them completely, including between the toes. Charge the device fully before the first use.
Step 2: Pick the right roller or disc
Fit a coarse roller or disc for thick heel skin, or a fine one for mild roughness and finishing. Make sure it clicks in securely before you switch on. If you are unsure which grit to use, start with the finer one, because you can always move up to the coarse one.
Step 3: Switch on at the lowest speed
If your model has more than one speed, switch on at the lowest. A slower spin removes skin more gradually, which gives you time to feel how your skin responds. Move to a higher speed only if a stubborn spot is not changing, and on a one-speed model use a lighter touch instead.
Step 4: Touch lightly for 2–3 seconds per spot
Rest the roller lightly on the hard skin and move it in short strokes for about 2–3 seconds per spot, then lift and check. Some manufacturers set a 3–4 second limit per area, so 2–3 seconds is the safer place to start.
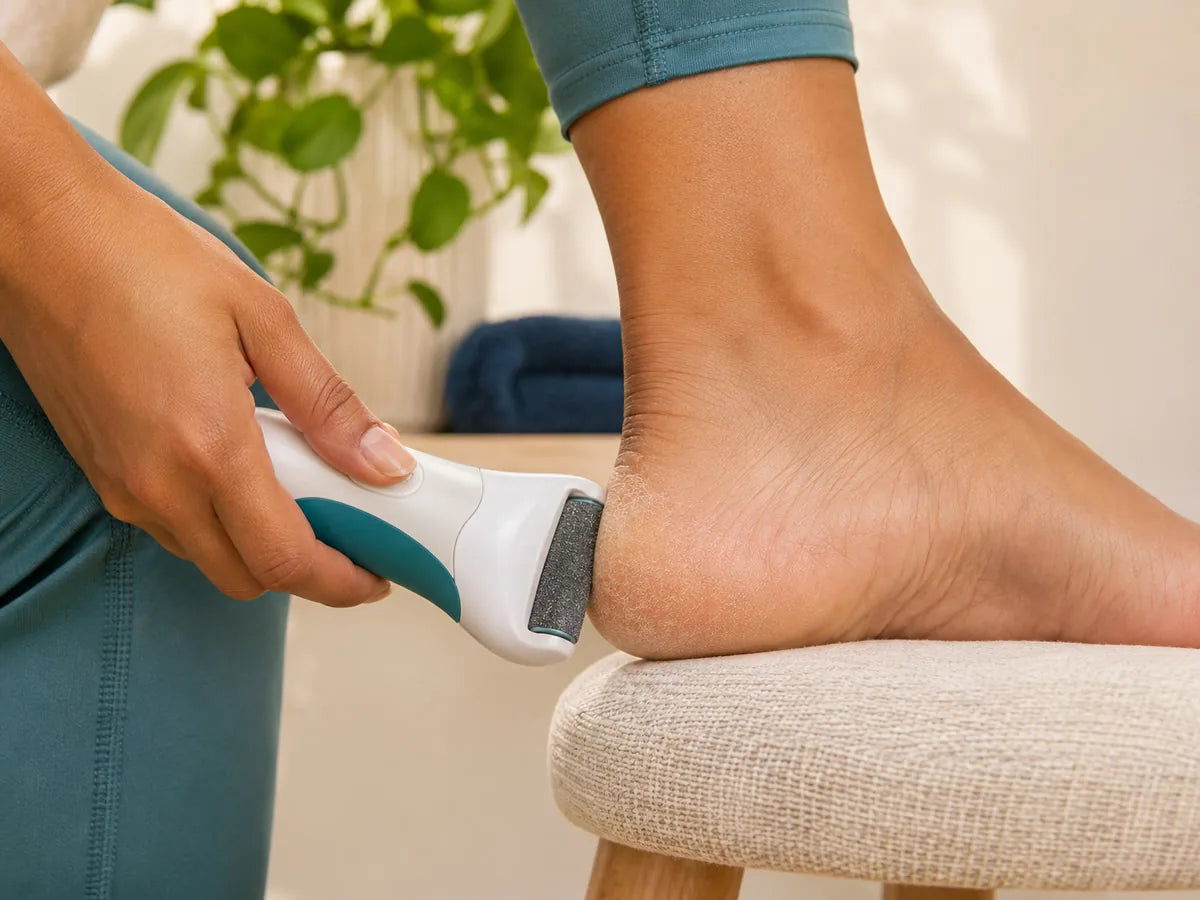
Do not press hard. Heavy pressure removes skin faster than you can judge, and it can stall the roller. Stay on the heel and other thickened areas, and avoid thinner skin such as the arch and around the ankle.
Step 5: Check your skin and stop while some callus remains
Run a finger over the area after each pass. Stop when the skin feels smoother but a thin layer of callus is still there, because that layer protects skin that takes pressure every day.
Note: Stop right away if the skin turns sore, red or tender, because over-filing can cause bleeding and infection.
Step 6: Brush off the dust and moisturize
Brush or wipe away the skin dust, then moisturize your feet. A heel cream with 10–25% urea helps soften thick, dry skin. Rinse the roller afterward if your manual allows it (see the care section below).
Is a callus remover safe, and who should ask a doctor first?
An electric callus remover is safe for most people with healthy feet when they follow the manual, use a light touch and keep away from the situations below. Whether it is safe for you depends on your health and on the condition of the skin you plan to file:
- Diabetes, poor circulation or reduced foot sensation: Ask a doctor first, because calluses can break down into sores and reduced feeling means you might not notice an injury.
- Broken, sore, cracked or bleeding skin: Skip these areas, along with warts and wounds.
- Pregnancy, a pacemaker or a skin condition: Some manufacturers advise asking a doctor before use.
- Pain or irritation: Stop right away.
- Sharp tools: Never cut or shave calluses with blades or foot razors.
- Children: Keep the device out of their reach.
Note: See a doctor or podiatrist for a callus that is painful or has no clear cause, because a professional can check it instead of you filing more.
What you need before you use a callus remover: wet or dry feet?
Use your callus remover on clean, completely dry feet unless the manual says your model is made for wet use. Many electric foot files, including the three models covered later in this guide, are made for use on dry feet, so you do not need to soak first. Some other models are labeled wet/dry, so check yours before you put it near water.
Gather these before you start:
- The device: fully charged before the first use.
- The right roller or disc: coarse or fine, depending on your skin.
- A soft brush or cloth: to sweep away skin dust.
- Moisturizer: for your feet afterward.
Note: Keep the body of a dry-use model away from water, and do not use a model while it is charging if the manual warns against it.
Which callus remover roller and speed should you use?
Match the grit to how thick the skin is. Grit is how rough the roller or disc surface feels. If your model has more than one speed, start at the lowest.
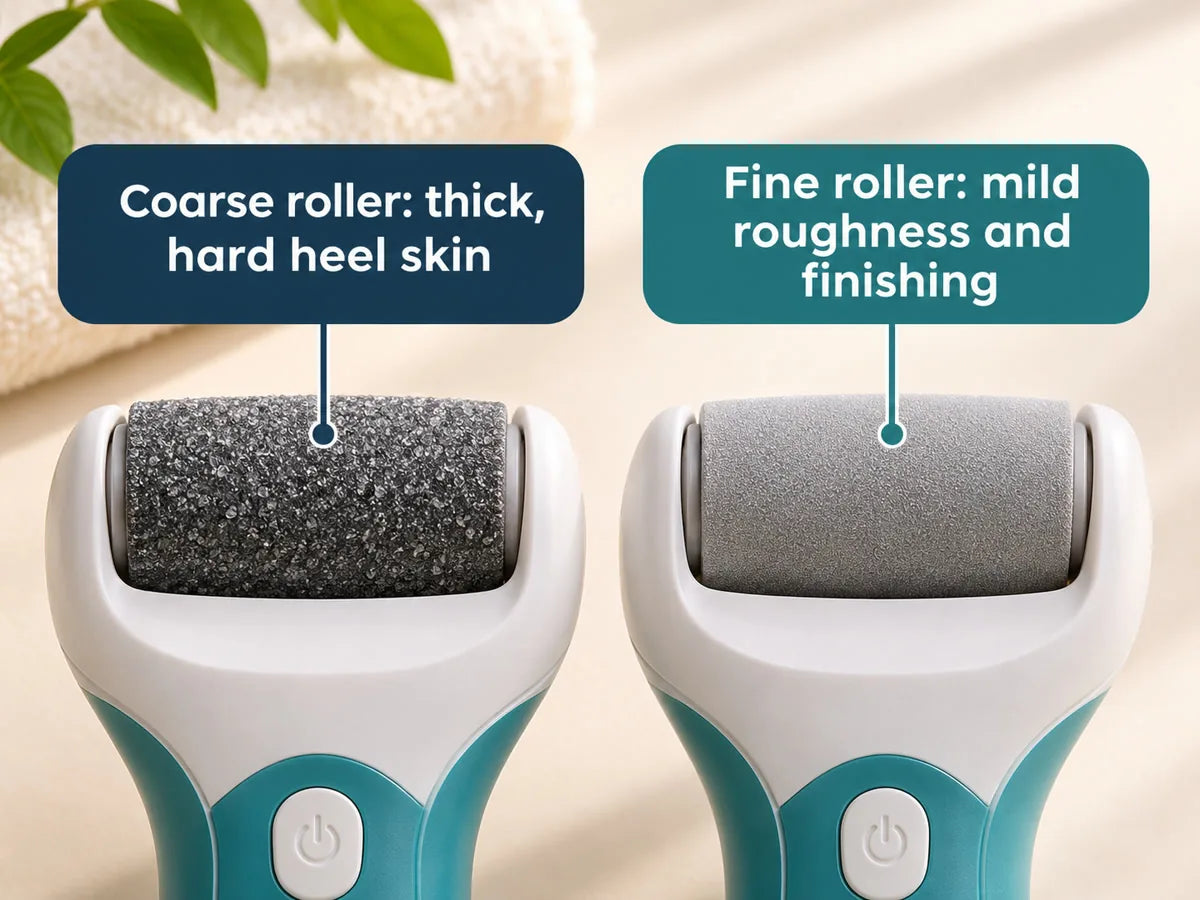
| Skin situation | Roller or disc | Speed or direction |
|---|---|---|
| Thick, hard skin on heels | Coarse roller or disc | Start low; go higher only for stubborn spots |
| Mild roughness or finishing | Fine roller or disc | Low speed |
| Nail surface | Sanding sleeve (2-in-1 models) | Gentle buffing, light touch |
On a two-speed file, the lower speed gives you more control. A one-speed model has no slower setting, so use a lighter touch instead. A forward-and-reverse model lets you switch direction to work both sides of the heel without changing your grip.
Common callus remover mistakes and how to fix them
Watch for these common mistakes:
- Pressing hard: Let the roller rest on the skin and do the work.
- Staying too long in one spot: Count 2–3 seconds, then move.
- Filing broken or sore skin: Wait until the skin is intact and comfortable.
- Over-filing: Stop while a thin layer of callus remains.
- Using the wrong grit: Use coarse for thick heels and fine for finishing.
- Skipping moisturizer: Apply foot cream after every session.
- Using worn rollers: Replace a roller or disc once it feels smooth.
How often should you use a callus remover, and can it make skin thicker?
Once or twice a week is the schedule one manufacturer suggests. There is no standard schedule across brands, so let your skin guide you and space sessions further apart if your feet feel tender. A fine roller suits light upkeep once the thickest skin is gone.
Gentle filing is not known to make skin grow back thicker; calluses return because the friction or pressure that formed them continues. Check your footwear: well-fitted shoes and padding over pressure points help reduce that friction. Results build gradually and vary from person to person.
How to clean and store your callus remover
Clean your callus remover after every use so skin dust does not build up. Follow these steps:
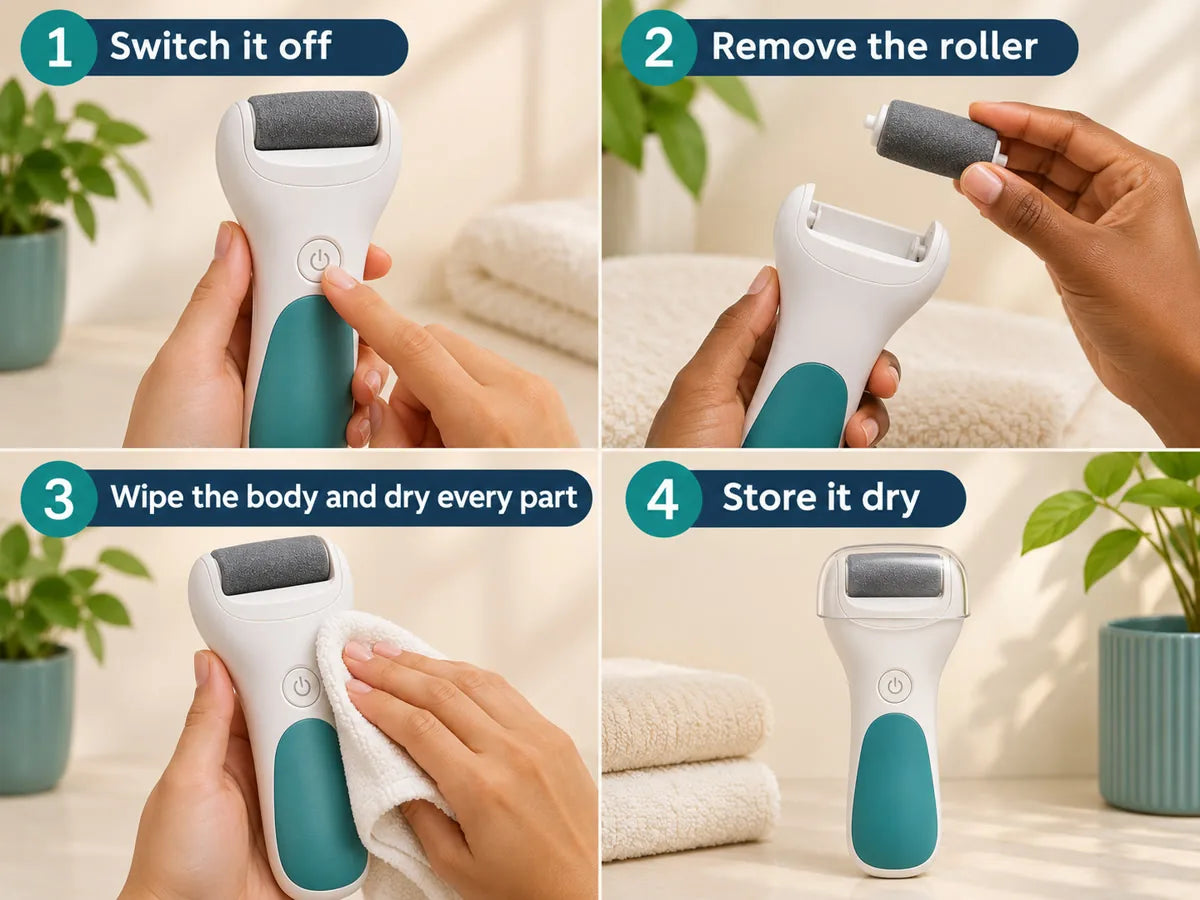
- Switch it off: Turn the device off before you touch the head.
- Remove the roller: Take off the roller or disc and rinse it only if your manual allows it. Some models have a quick-release button, and some come with a cleaning brush for the dust.
- Wipe the body: Use a cloth, and dry every part before reassembling.
- Store it dry: Put the protective cap back on if your model has one, and keep the device in a dry place.
Use one device per person for hygiene. Replace a roller once it feels worn or files less well. One manufacturer estimates 30–40 minutes of continuous use per roller, roughly 8–10 uses, though this varies with the model and how you use it.
Callus remover stalling or not working? What to check
Most problems come down to pressure, battery or a worn head:
- Roller stops on the skin: Lighten your pressure, because pressing hard can stall the roller.
- Weak or slow spin: Recharge fully. Some models have no full-charge light, so charge for the full time given in the manual.
- Little effect: Replace the roller or disc if it feels smooth to the touch.
- No change on thick skin: Switch from a fine head to a coarse one.
- Still not working: Contact the seller. Decor Your Life products carry a 12-month limited warranty against manufacturing defects, and damaged, defective or wrong items are replaced or refunded with no need to send them back. See our warranty details.
Which callus remover fits your routine?
Choose by roller type, number of speeds and extras such as spare rollers or nail sleeves. Battery life also matters. The three models in our foot care range are:
Rechargeable Electric Foot File with Fine and Coarse Rollers
The Rechargeable Electric Foot File with Fine and Coarse Rollers is a cordless file with a spinning roller that buffs rough heels and dry patches. It has two speeds, so you can start gently and go faster on stubborn spots. Its LED light helps you see the area you are working on.
- Best for: Rough heels, dry skin on feet and at-home pedicures.
- Time: About 2.5 hours of USB charging for about 40 minutes of use.
- Pros: Coarse and fine rollers, washable rollers, a cleaning brush and a protective cap in the box.
- Cons: Shorter runtime per charge than the two models below.
Electric Callus Remover for Feet with Spare Rollers
The Electric Callus Remover for Feet with Spare Rollers has a wide spinning roller that covers the heel in fewer strokes. It runs at one speed, so you control the result with a lighter touch. The roller pops off with a side button for rinsing.
- Best for: Hard skin on heels and the balls of the feet.
- Time: About 2 hours on a 5V USB source for around 60 minutes of use.
- Pros: Spare rollers included and a quick-release head.
- Cons: One speed only; the body is not waterproof; there is no full-charge light; do not use it while charging.
Cordless 2-in-1 Foot Callus Remover and Nail Buffer
The Cordless 2-in-1 Foot Callus Remover and Nail Buffer uses flat sanding discs for heels and small sanding sleeves for buffing nails. The head spins forward or in reverse, so you can work both sides of the heel without changing your grip. A display shows the current setting.
- Best for: Rough heels plus nail buffing.
- Time: A 1,200 mAh battery charges by Type-C in about 2 hours for around 60 minutes of use.
- Pros: Coarse and fine discs plus nail sleeves, so one tool covers two jobs.
- Cons: The body must stay dry, and you will need to replace the discs once they feel smooth.
[dyl-products: rechargeable-electric-foot-file, electric-callus-remover-for-feet, cordless-foot-callus-remover-nail-buffer]
Frequently asked questions
How long do you leave callus remover on?
Hold an electric callus remover on one spot for only 2–3 seconds, then lift it and check the skin before moving on. Never leave it in one place. Callus gels and pads work differently, so follow the timing on their label.
How do you use a callus eliminator gel?
A callus eliminator gel works differently from an electric file, so follow the steps and timing on that product's label. Keep it off broken or sore skin. If you have diabetes or poor circulation, ask your doctor first, because chemical removers can burn skin.
Do electric callus removers really work?
Electric callus removers can reduce excess hard skin and leave heels feeling smoother, but no lasting results have been established for any specific device. Calluses return if the friction or pressure behind them continues, so better-fitting shoes also help.
Can you use a callus remover on cracked heels?
No, skip the callus remover on cracked heels, because filing split, sore or bleeding skin can cause bleeding and infection. Moisturize the heels instead, and see a doctor if the cracks are painful or keep coming back.
Learning how to use callus remover tools well comes down to a light touch, short 2–3 second passes, leaving a little callus in place and moisturizing afterward. Ask your doctor first if you have diabetes or poor circulation. To compare rollers, speeds and extras, browse our foot care devices; every order ships free in the US.